Post by liane on Aug 21, 2007 10:14:21 GMT
Well, I personally think textures are REALLY hard to use, which is why i rarely use them, but here's a simple texture tutorial.
1. Prepare your image first, you don't want a bad quality image and a fantastic texture, because however great your texture is, it won't work wonders with a low quality image.
2. Choosing your texture is really important, don't choose ones that are too harsh or "busy", for example:
so I'm going to use the second one.
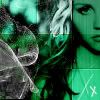
I'm using this image: www.innocently-charmed.com/blends/blend.png
(I havent actually edited the quality, because it was reasonable to begin with)
3. Copy your texture and paste as a new layer over your image.
4. Using the layers palette, change "normal" to one of the effects. if u keep clicking down you can view them all. Screen works best in most cases, so I'm using that.
img521.imageshack.us/img521/759/texture2xu7.png
You'll notice that the whiter parts of the texture are over their faces, but this can be sorted.
5. Using the clone brush, (set it fairly large, lower the opacity a little) then find a part of the blend thats near and not so "bright" and clone it over the white bits. if that makes sense. So for example, Shannen's face is really bright, so click the bit at Alyssa's face to clone, then click on shannen's face.
6. Once you've done all that, you should get this:

I'm not great at explaining, lol, especially the cloning bit
1. Prepare your image first, you don't want a bad quality image and a fantastic texture, because however great your texture is, it won't work wonders with a low quality image.
2. Choosing your texture is really important, don't choose ones that are too harsh or "busy", for example:
this is difficult to use : www.thin-spark.com/goodies/textures/text-010.jpg
this is easier: www.thin-spark.com/goodies/textures03/gpt-text-05.jpg
this is easier: www.thin-spark.com/goodies/textures03/gpt-text-05.jpg
so I'm going to use the second one.
I'm using this image: www.innocently-charmed.com/blends/blend.png
(I havent actually edited the quality, because it was reasonable to begin with)
3. Copy your texture and paste as a new layer over your image.
4. Using the layers palette, change "normal" to one of the effects. if u keep clicking down you can view them all. Screen works best in most cases, so I'm using that.
img521.imageshack.us/img521/759/texture2xu7.png
You'll notice that the whiter parts of the texture are over their faces, but this can be sorted.
5. Using the clone brush, (set it fairly large, lower the opacity a little) then find a part of the blend thats near and not so "bright" and clone it over the white bits. if that makes sense. So for example, Shannen's face is really bright, so click the bit at Alyssa's face to clone, then click on shannen's face.
6. Once you've done all that, you should get this:
I'm not great at explaining, lol, especially the cloning bit